DO you like to put puzzles together, but don't want to take them back apart?
You want to glue them together but not sure what to use. Or what to do with them.
by this at Walmart or any craft store.
Take poster board or a big piece of card board
I bought 2 sheets. I put my puzzle together on top of one. And you can use the 2nd sheet to cover the puzzle when you are not working on it. Then no one will mess up what you have done so far. And if you have cats, they can't get to the loose pieces.
Once you put your puzzle together put the 2nd sheet of foam board and have someone help you flip it over. Layer a piece of either newspaper or gift wrapping paper onto the back of the puzzle.
DO NOT glue yet or your front of your puzzle will stick to foam board.
Now flip again
Before coating if you want to add a label to the puzzle write or type
one up
and apply to bottom right corner.
Coat the front of your puzzle 3 times with Modge Podge.
Dry in about 2 hours between each coat.
Now put foam board over it and flip again.
You can either coat the back or glue paper on the back. I glued Kraft paper on the back of mine
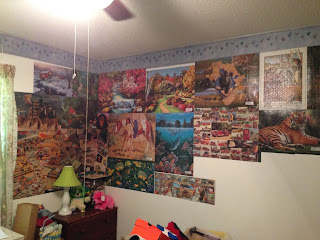
Once you have several puzzles. And an empty wall you can start covering it.
I started in the middle toward the top.
Tools you will need are:
1- yard stick
2- ruler
3 - scissors
4 - pencil
5 - Hammer
6 - xacto knife
7 - straight pins with flat top
8 - Level
Starting at top middle of your wall hang your first puzzle.
Use your level at the top or bottom of the first puzzle you put up to make sure it is level
Using the Straight pens
Add your puzzles in random sizes so it forms a sort of collage.
Holding the Straight pin so that your fingers are all the way to the head and all the way close to the wall.
Keeping the pin at an angle tap tap tap small taps. If you don't follow these directions you will constantly bend your pins.
If your puzzle is bowing in the middle at all add a pin somewhere around there. Do not tap them in all the way, then tap side of head bending the pen. Flatten it done and it will hold puzzle flat.
I should have removed the boarder that the previous owners put up. But wasn't sure how.
I first started in the middle of the wall but then I had a problem at the top. See how one has a gap. So I took the Rhino down and started at the top. I also found no matter how flat the side of the puzzle looks it is not flat.
So I used some green card stock I had on hand.
I cut 3/4 th inch by the length of paper
I then lined around each puzzle.
I learned by mistake. Here is what it looks like when you don't line them.
when you line around them with green or another dark color it will look like this.
Using the Straight pens
Add your puzzles in random sizes so it forms a sort of collage.
Now why do you need Ruler and yard stick. Well I ended mine at a certain point on the wall. So I had to cut them to fit. I also wrapped them around the corners.
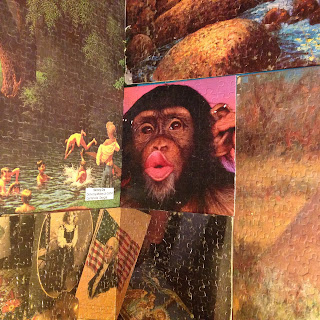
I ended up with a small 8 x 8 square. So I took a small puzzle one of my Foster girls did and cut it to fit. The Monkey face.
I still need to finish beside the curtains. Curtains by the way are pulled to the side because I have a bird cage sitting on desk right now and I don't want them pooping on the curtains. lol
And now the finished or almost finished room.
Thank you for checking out this Tutorial.
Please Follow My Blog
Comment
and
Share on FB and Pinterest
Have a Great Day !


