ATC's

ATC's
Artist Trading Cards I have Created

Monday, December 7, 2015

Snowman Painting with Acrylic Paint

I am so far behind on posting it is not even funny.  I'm sure all of you are getting behind on things also.  The holidays are fun by overwhelming.  LOL  I have taken a couple more painting classes since the last post and want to share them with you.  
  I'm so sorry I forgot to take pictures of the steps.  I took a few so will put them below.  

But before I do here is the steps I remember.

Paint your back ground a blue you like.  Mine is Teal and blue mixed.

Next either with Chalk or with painting draw a head and body.  You can draw it up high like I did so your had hangs over the top of the painting.  Or down lower so hat and top of hat is inside the painting.  Like they did at Painting with a Twist in Picture below.
So as you see they put there head down a bit lower.  I also didn't make my head quite as big.  I had it smaller and kept making it bigger and bigger.  But it still never got as big as theres did. lol

Next paint your hat and scarf on.   I as you can see chose to make mine look like a Yarn crochet fuzzy hat.  I mixed purple and white by taking a medium size flat brush and tipping the left side of the flat brush in white and the right side in purple.  Then dabbing it on.  NOT swiping.
My hat kind of well seemed to get bigger and bigger because it just doesn't look like theres.  But now I see there head was wider.  I like mine a lot though.  The Teacher teaching didn't teach us the blue shading on the face.  I see that now and wish I had noticed it then on the wall example.
I wasn't real thrilled with so much body and thought it needed something so I added more scarf.  The Teacher said to use white shading above the fold in the had but I took my Purple and lightened it with white.  I like it better.  Or think I do.  lol.  
I then added my mouth and snow.  And a little shading on scarf in a circle to look like it is tied in a not.  Up close i didn't' think I did such a good job.  But in this picture it looks good.  So I am proud of myself.

Now in the pic below if you look all the way to the right at the painting on the wall it has a tongue inside the mouth showing.  I was going to attempt that but changed my mind.  She did not teach the mouth.  I added that after seeing the one on the wall off to the side.

Click on Picture to enlarge it.

Hope you enjoyed this painting.  I have another that was done before this one but have to find my photos I took.  Happy Holidays to you.


If you like what you see please join my blog site and subscribe so you
can get updates when I add more art.


Thursday, November 5, 2015

Painting with a Twist A Witch

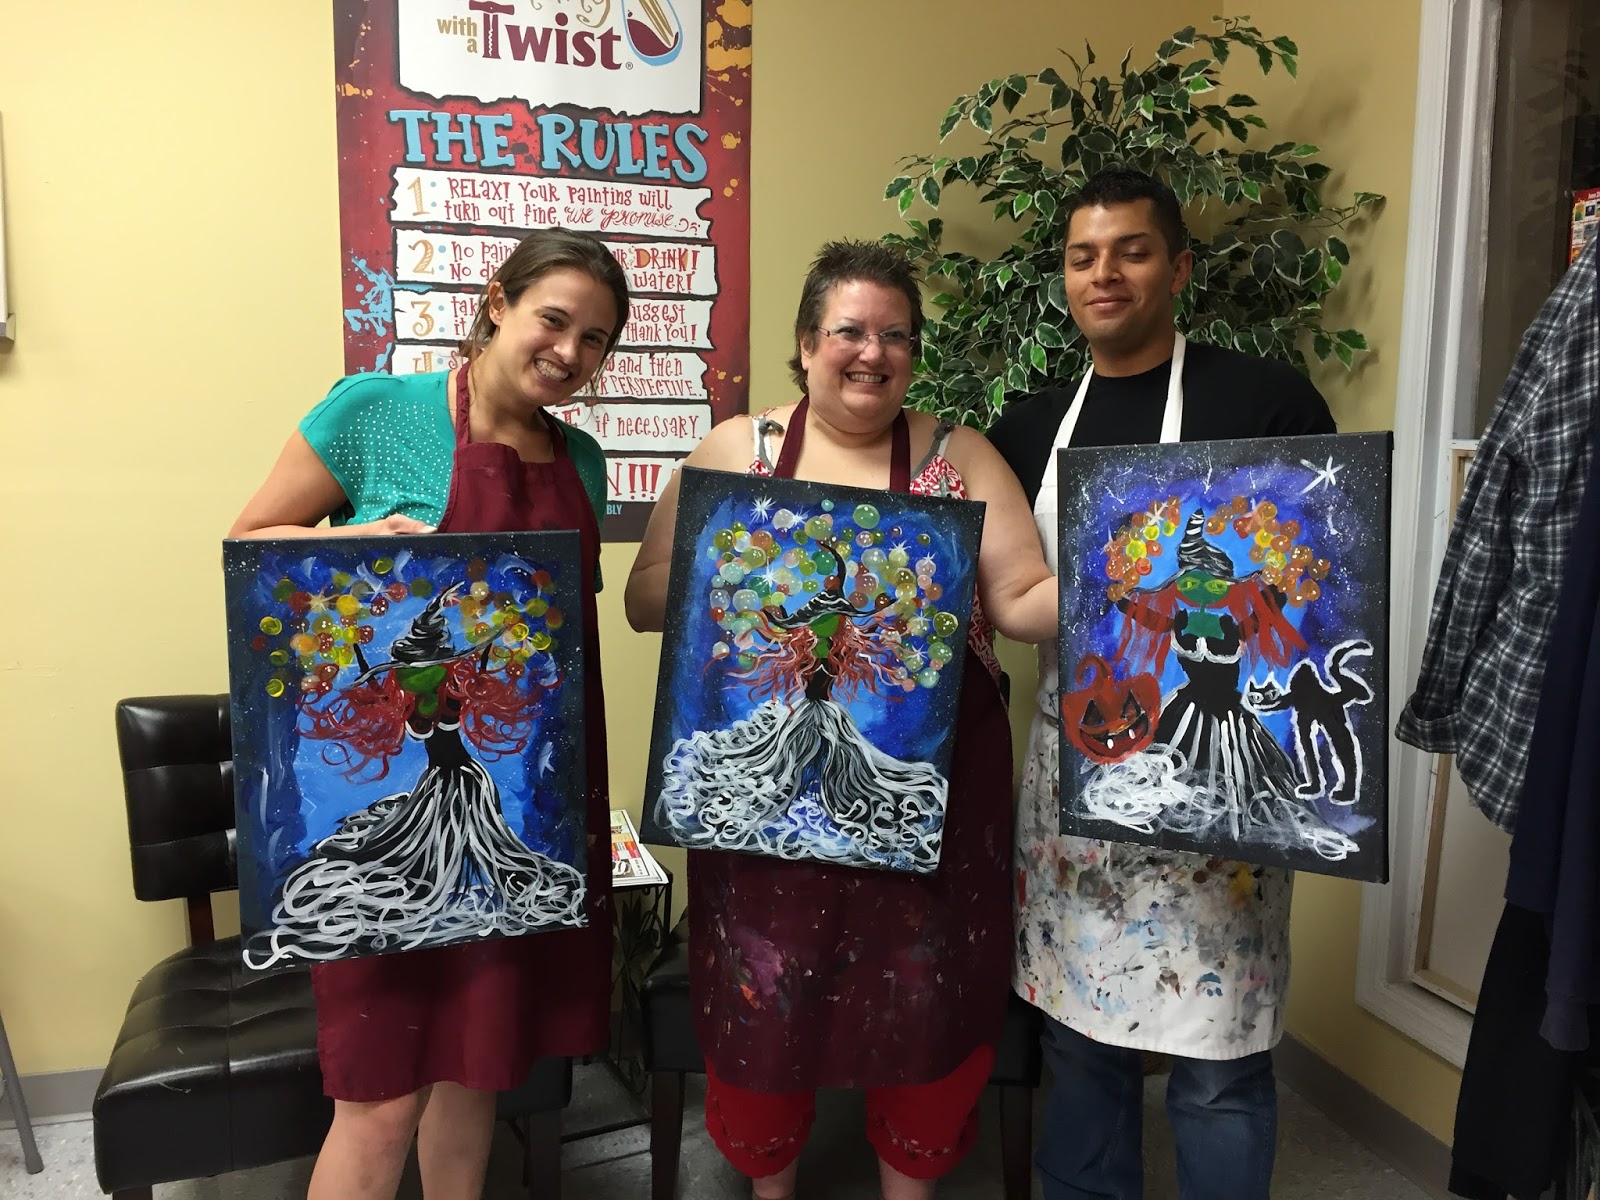
Well I've started a new craft.  Painting with Acrylics.  I have had Tole Painting Classes and do TONS of different crafts as you have seen from my many posts on here.  But I have always wanted to paint like my sister Kim.  She does Beautiful Oil Paintings.  But I have asthma and the oils and turpentine and all that stuff is so strong to breath in.   So when I found out we had a local shop that teaches painting I have been wanting to go.  It took me a year to get up the nerve.  Here is my very first EVER painting.  I took the class with my daughter Crystina and her new hubby Danny.  
I'm in the middle.  Danny as you can see started out really good, then he got bored.  

I'm going to show you in steps.  Maybe it will help some of you paint this painting.
We started out by painting the canvas a light blue and WHITE mix.  Medium to Large Flat brush, dip one corner in light blue, and one in white.  Keep doing this until the entire back ground is covered.  Check very good to make sure NOT ANY WHITE CANVAS is showing through.   You can paint withing an inch or so from the edge if you don't want to cover the entire thing because next you will paint black.

Cover the whole outside in BLACK.  You can dip one edge in WHITE and one in BLACK to paint part way in from there.   She told us to make circles of paint.  I didn't like this so I swiped left n right.  DO NOT press down hard with your brush or you will ruin it.

Next use Flat brush one side diped in Blue one in BLACK keeping the black edge toward outside.

Then it is time for Bubbles.  Use a medium to small flat brush

Dipping brush one corner in one color and other corner in the other color.  Make some with light YELLOW & WHITE, some GREEN & YELLOW,  RUST and WHITE, mix some GREEN and WHITE really good in a corner of your pallet.  Use green and LIGHT GREEN mixture.   Now take your brush, place it lightly where you want the bubble swirl to the right making half a circle.  PICK UP YOUR BRUSH start back where you started the swirl going to the right BUT THIS TIME swirl the brush to the left.  DO NOT REFILL your brush.  Load it ONE TIME and do 2 bubbles then reload.  Do NOT fill the middle with any bubbles.  You can also use a smaller flat brush to make smaller size bubbles.

Then take WHITE and very small pointed brush put dots on your bubbles.  Some dots dip brush and add a second layer to them making them a little darker.  

Next the Stars.  You can choose how many to do.  The way the teacher taught didn't work well for me so I will explain how to do both.   Her way put a good size dot in the space you want the star.  Then using the wooden end of brush drag out paint in five points starting at the dot each time.

Now my way  using a small pointed brush put a dot where you want the star.  Then very lightly put from the do 5 points or more.
Now load your take you white put in a container or another spot on your pallet.  
Put some WHITE and Add a dip or two of water.  Splatter it all over by swiping it off of one finger on your other hand.  
Photo above is to show you how to do the splatters.  
Didn't take this at the class as you can see.  LOL
Everyone does it different.  Wish I had added more splatter to mine.

Now get some Chalk a piece of WHITE Chalk
You are going to draw the witch on your painted canvas.  If you mess up use a moist paint brush to erase the mistake away.
Draw a circle for the head.

Next draw a large curved line for the hat brim.

Then add your top to the hat with a curved pointed top.

These are the steps they taught in.

Next draw a neck.

Then flat line for the shoulders.

Then 2 lines down from each side curved inward to form a narrow waste line.  Draw another line to close off this shape.  Then draw 2 half open circles to form boobs.

Erasing with water the lines going through the boobs.
Next draw the skirt swooping out at the ends.  Draw two arms stretching out into the bubbles.  No hands needed.

Now it is time to paint.

Mixing a MEDIUM GREEN (white and green) sort of like mine.  Paint the face, neck and top area of chest GREEN

Paint the outside edges of the skirt in BLACK.  Leaving a V open in the middle of the Skirt.
  Look at the above picture.  See the left side of the dress.  See the outside left white line.  Paint a black section above that do NOT paint over the white.  Kind of wavy.  And paint your hat and arms and top of dress.  On hat paint top left wavy.
Paint 2 light lines under the boobs.  Look at first pic and then this one above.  I think they are both 2 dark.  I wish I hadn't painted the lines at all. Add white lines to hat.  Mine are not done right look at my daughters.  

Going from waist down paint white lines.  Look at my painting and my daughters.

Next using white and some white and great and the pointed brush paint swirls and swirly S's around the base of the dress.  Leave middle open.
Next add the hair.  Using Red and Rust .  Rust and White, Red &  White.  The teacher said to paint them swirly.  Like we did the ones around bottom of dress.  Look at all three paintings.  I didn't do mine like that.  

Next. 

Then BLACK lines half way down on middle of dress V opening.  Finish doing your white swirls.

Oh I forgot.  Taking a darker green mixture paint a shadow under the brim of the had and under her neck.  Look at mine and my daughters.

Well that is pretty much all I can help you with.  If you make a mistake paint the color needed to take one step back.  Then paint the area again.  Have fun.

If you like what you see please join my blog site and subscribe so you
can get updates when I add more art.


Tuesday, November 3, 2015

Reviews..... Check out these posts for 2012

Ok I got thinking about something a bit ago.  How many of us blog about something important that might help out others.  Or maybe do a blog on a technique or something we really want others to see.

Well probably all of us.   And they get viewed, then are on the back burner or way back in the closet so to speak just covering up with dust.  I'm not sure if you are like me, but I hate clicking on the month on a blog or on the year and then months to see what might have been posted.  So I am going to start posting the first and 15th of each month several older posts past.  That way you can check them out by clicking on the link.  Or I hope it takes you right to them.  I might have to do a bit of work to get this right. So please bare with me while I try to get this right.  Go right to the post and no scrolling for ever to find the particular post.

 Starting with the year 2012.

posted Saturday, January 21, 2012

Shows how you can recycle a gift bag into several different cards

posted Sunday, January 22, 2012


How to tell the Sweetest Bell peppers by the bumps on it.  How to make bread soft again.  How to make Easy Fast Deviled eggs.  How to keep cut up cheese last longer.  And a tip for each picture featured above.

posted Sunday, January 22, 2012


Why is your lint filter empty but dryer heating unit went out.  When cooking does peanut butter or other sticky things stick to your measuring cup?  See how to keep it from doing that.  Did you seal your envelope and realize you forgot to put something inside.  See what you can do.  Have an ant problem?

posted Monday, January 23, 2012
Sharing my Graduation Card I hand made for my daughter.  Easy to make.

posted Friday, January 27, 2012

great tutorial listed here.

posted Friday, January 27, 2012


posted Saturday, January 28, 2012


posted January 29, 2012


posted Sunday, March 25, 2012

Easy yummy recipe
posted Monday, March 26, 2012


posted Monday, March 26, 2012


Well that's it for 2012.  Hope you enjoyed this idea of Reviews.  You can always click on the word Reviews under labels on right hand side and it will bring up any reviews I do.  Thanks for checking out my blog.  Please subscribe I need more subscribers.


If you like what you see please join my blog site and subscribe so you
can get updates when I add more art.

Got some time to View my sons videos and mine on his Asperger's

Are you bored and in the mood just to watch a video or 2?  Then why not watch a few of my sons videos.  Well first watch mine about my son.  He has Asperger's.  But we are not like other families that learn from the get go or beginning of his younger school years.  Joey is now 24 and we didn't find out what was different about him until he was 22.  Well we knew he was a little different because he didn't want to grow up.  But he is so very smart we kept getting thrown off by that.  Once his friends started leaving him and we heard through the grapevine that they were not coming around because he didn't want to grow up or run the roads with them we knew it was time to see about getting him tested.  

This is NOT cheap by the way.  But without this testing you can not get your child on some kind of disability and insurance so when you are not around someone will still be there to take care of them.  We paid almost $1,200.00 to a very well recommended Psychiatrist that did testing like this for individuals including for local court judges to see if prisoners were able to handle regular prison life.

You can view the videos by clicking on the title below each picture


Joey is great at Graphic Design and Video editing as well as several other things.  Here is just a message to his fans.  Please watch and subscribe.


Now this next one is pretty funny.  Not sure why there are no comments under them.  Please watch and comment.  If you have a child that is into watching videos these are all fine for kids to watch.  Forgot what the ratings are on things.  G rated maybe.  LOL  No Parental Guidence needed.


 Ok I told my son to pick out one video that he really wanted others to see.  This is the one he chose below.  So please watch it and share some of these videos.  Especially the first one to maybe help some other moms out there.


Thank you for taking the time to view some of the above videos and for viewing my blog.  Subscribe to my blog and our videos if you don't mind.  The more subscribers the more views.  

Have a great day.


If you like what you see please join my blog site and subscribe so you
can get updates when I add more art.


Tuesday, October 6, 2015

DIY Camera Strap

Need or want a new Camera Strap but just can't find one that you like.  Or maybe you have a friend that is a Photographer and would like to get them a gift but not sure what to buy.

Well here's an idea.  Make a personally designed Unique one of a kind camera strap.

I found this idea on Pinterest and fell in love.  To see the original post and Video just click on the link below the Picture 


Here are the supplies that you will need


about 2 yards of Cotton Webbing.  (at least 1 1/2 to 2 inches wide)


Masking Tape


Acrylic Craft Paint


2 Swivel Hooks
You can find these in craft stores or from The Etsy Shop in the link below


Fabric Glue


Needle and Thread
Cotton Thread is the Strongest


Ok I did this digital in Photo Shop but you get the idea

Ok now get your supplies and make that new strap.  Don't paint the acrylic paint to thick or it will crackle when strap is used.


If you like what you see please join my blog site and subscribe so you
can get updates when I add more art.


Halloween Almost Here

But with it comes this darn colder weather.  Well at least it is back up to 81 for a couple days.  Not quite sure where the Fall weather went.  Someone must not have gotten the memo on that.  LOL

With Halloween comes Kids and Candy.

Do you get lots of little ones (AND BIGGER ONES) ringing your door bell with the words Trick or Treat upon there lips?   For 14 years we lived out in the country and only one little family stopped by.  2 years ago we moved to the City or just outside of it and my goodness what a difference.  I think we got 85 last year if not more.   I'm going to count them this year and hopefully take some photos.  I just love Halloween and all the decorations.  Here are a few pics of my decorations. Maybe you will get some ideas from them.


Above is the rubbery eyes I got from the dollar store.  I took a fish bowl jar and put it on top of a candle holder.  I put a piece of styriphome glued to a butter lid, on top so I wouldn't need so many eyes.  

On the top shelf I got a hold of different bottles and put labels on them Like Eyes of Newt, But Juice.  I used a gold web spray inside of a jar then added a tiny skull.

How to Make a Potion Bottle
Just Click above to learn how to make a Potion Bottle.  Easy Directions.  But I'm sorry I have not finished the top of it.

Below are a few pictures on how I decorated our front porch.


The witch and Frankenstein Below I got off a local Sales site for hardly nothing.  Check out VarageSale.com and look up your city see what is the closest near by where you live.


Every year I say I am going to make up treat bags and every year I don't seem to get around to it.  Last year I made some little ones so happy with giving out candy and little disney rings.  Had lots made up to sell (Hello Kitty) and Etsy say NOPE can't do that.  So I gave them out to the little girls.  Even had one little boy say  (I think I would like one of those too).LOL


If you like what you see please join my blog site and subscribe so you
can get updates when I add more art.